Did you know that the production
of salt was legally restricted in ancient times, so it was historically used as
a method of trade, for barter, and also as currency? Today, about a
quarter billion tons of salt is produced every year globally. What do we even
do with so much salt? Here’s a fun idea - make crystals! That’s right. You can
actually make beautiful, pristine crystals from salt yourself.
Salt is an extremely water soluble solute. In fact, most of
our salt comes from the sea and some is mined to meet our demand of bulk rock salt. But the question is: How we can
make a crystal out of the flaky salt?
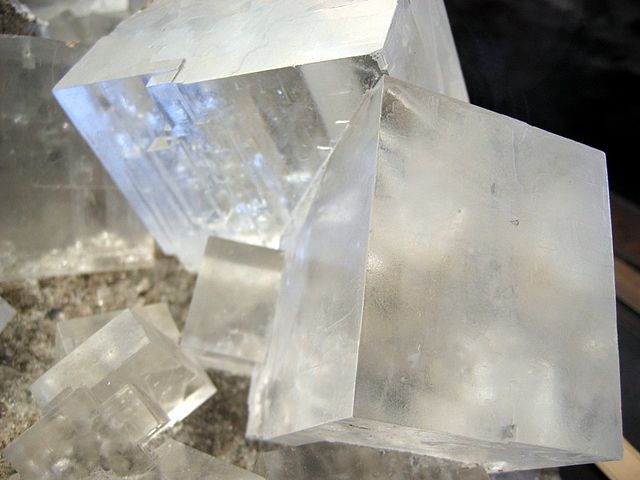
Crystallization takes place when the concentration of the
solute exceeds solubility in a particular solvent. Therefore, the residual
un-dissolved solute particles latch onto each other to form a crystal
consisting of sodium chloride’s signature crystal lattice structure. This is
how rock salts are naturally formed
too.
Here’s how you can
make your own salt crystals at home.
1.
Heat water: Pour around 120mL of water
and wait for it to boil.
2.
Pick your salt: You can add plain old
table salt or choose any other salt. Do not use iodized salt because they don’t
work well. We recommend alum because it crystallizes relatively fast and you
can find it easily too. You can find other types of salts such magnesium chloride, calcium chloride and
many others at Rock Salt USA.
3.
Stir until you reach saturation: Take
the pan off heat and add in about 60-120 mL of salt and keep stirring until
water becomes clear again. Clarity in water means all the salt has been
dissolved. At this point, keep adding more salt and stir until the solution
reaches saturation and no more salt can be dissolved. At this point, you’ve
made a supersaturated solution which basically means the solution contains more
salt than water can hold. Supersaturated solutions start forming crystals
easily.
4.
Dispense the solution: Dispense the
supersaturated solution in a clean container, preferably a transparent jar. You
can filter the solution with a filter paper as you pour it, so as to get rid of
any impurities to ensure your crystals are finer.
5.
Add food coloring: This step is optional
and comes down to personal taste really. You can add in the food coloring that
you want your crystals to be in the solution, or you can skip this step all
together if you want to have translucent crystals.
6.
Prepare a suspension system for crystal formation:
All you have to do now is provide the salt molecules in the supersaturated
solution, something to latch on to. Grab a pencil long enough to lie across the
top of your jar and tie a string around it. Cut the hanging string at a length
that can be submerged in the solution without touching the bottom of the jar.
Place the pencil on top of the jar so the hanging string extends into the
solution and then put the whole thing at an undisturbed place.
7.
Wait: Alum crystals start growing within
a few hours, so does Epsom salt. So, keep checking periodically. Some salts may
take a day or two. The longer you wait, the bigger your crystals will grow.
When you feel you’ve achieved the crystal size you wanted, you can take them
out!
If you’re looking
for different kinds of top quality rock salts such as ice melt, bag salt and bulk rock salt, Rock Salt USA is the best in the
business.
No comments:
Post a Comment